There are two ways to sign up for a PBI FLOW account:
From the PBI FLOW website: Visit pbiflow.com and navigate to the Sign In page.
From the PBI FLOW app: Open the PBI FLOW app and find the Sign In screen.
Once you’re on the Sign In page (either on the website or app), you’ll see a link below the “SIGN IN” button that says “Don’t have an account? Sign Up.” Click on this link.
This will take you to the Sign Up screen. Here, fill in all the required fields (marked with an asterisk or “mandatory”) and click the “SIGN UP” button at the bottom.
Verifying your account:
After signing up, you’ll receive a verification email to the email address you provided. This email will have a link or instructions to activate your account. Follow these instructions to complete your registration.
Logging In:
Once your account is verified, you can log in to the PBI FLOW app using the email address and password you created during signup.
How to Authorise?
Authorisation (One-Time Setup)
Log in to the PBI FLOW app.
On the home page, click the Authorise button.
A pop-up window will appear asking you to choose a Power BI account to log in with. Select the desired account.
Once selected, the button will change to Reauthorize and a message “Authorized” will be displayed above it.
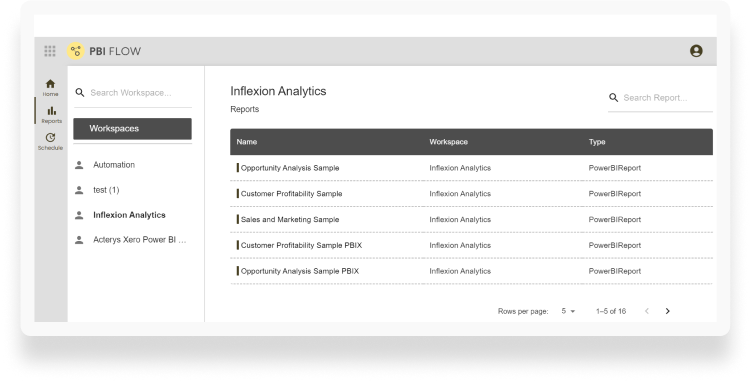
How to access Power BI Reports?
After successful authorisation, click on the Reports option in the left-hand pane.
You will see a list of all your workspaces. Use the search bar at the top if you have many workspaces.
Select a workspace by clicking on its name.
A list of reports within the chosen workspace will be displayed next to it.
Click on the report name to view the report.
How to schedule a Report?
Click on the Schedule icon in the left-hand pane.
In the Schedule details pop-up window, click the Add Schedule button.
The scheduling screen with two tabs, Schedule and Schedule Log, will appear.
In the Schedule tab:
Provide a name for your schedule.
Select the time zone, time, and interval (daily, weekly, monthly) for running the schedule.
Specify the file format and delivery method (email or other options).
Optionally, set start and end dates for the schedule.
Click Add Report to attach a report to the schedule.
An overlay screen will appear where you’ll need to provide email details first.
Enter the recipient’s name and email address and click Save.
Enter the email subject and body, then click Next.
In the Report tab:
Choose the workspace and report from the respective drop-down menus.
The selected report will be displayed below.
Verify the filter selections are correct and click Add Report at the bottom.
You’ll be returned to the main Schedule tab where the added report will be listed. You can edit or delete the report using the icons next to the report name.
How to update an existing schedule?
On the home page, navigate to the Schedule section. This will open the Schedule Details page.
A list of all your schedules will be displayed. Locate the specific schedule you want to update.
Click the Edit icon next to the chosen schedule. This will open the schedule in edit mode.
Edit the details of your schedule as needed.
Once you’re finished editing, click the Update Schedule button to save and apply your changes.
How to add a report to an existing schedule?
On the home page, navigate to the Schedule section. This will open the Schedule Details page.
A list of all your schedules will be displayed. Locate the specific schedule you want to add a report to.
Click the Edit icon next to the chosen schedule. This will open the schedule in edit mode.
Click the Add Report option. This will allow you to attach a new report to the existing schedule.
How to personalise emails?
When sending reports to multiple users, you can personalize each email with the recipient’s name. Here’s how to do it:
Begin your email body with a greeting of your choice, such as “Hi” or “Dear”.
Following the salutation, insert the placeholder {{name}}. This acts like a variable that will be replaced with each recipient’s name during delivery.
Example:
Hi {{name}},
This email contains your report…
Note: Replace this Email Placeholder Setup screenshot with high resolution image
When setting up your email list, make sure to include the first name for each recipient’s name. This data will be used to populate the {{name}} placeholder in each email.
When you send the email, the system replaces {{name}} with the actual name provided for each recipient. For example, if your list has “John” and “Susan” for names, they will see their own names in the email greeting.